Products #001:スティックPCとモバイルモニタで「情報を飾る」。HTML自作の壁掛け時計&デジタルアート
お疲れ様です、田村です。
リビングに時計がない生活で、常々不便を感じていました。
元々アナログよりもデジタル時計が好きなので、どうせなら大き目のデジタル時計が欲しいなと探していたんです。
Concept(思想):なぜ作ったか?
大き目のデジタル時計を探してみると、結構高いんですよね。大きければ大きいほど高い。
アマゾンのEcho Show 15みたいな壁掛けできるディスプレイも良さそうでしたが、それもお高めです。
そこで、「PCモニタを壁掛けして、そこに壁紙と時計を表示させたらどうかな?」と思いつきました。
これなら安価に、好きなだけ大きい時計が作れます。
ネットで同じようなことをやっている人がいないか探したんですが、意外と見つからなかったので、自作をスタートしました。
最終的なゴールは「市販品より安く、自分好みのデジタル時計兼デジタルアートフレームを作る」ことです。
Process(過程):どうやって実現したか?
実現にはいくつかの課題がありましたが、一つずつ最適化していきました。
1. 使用機材(プロセスの記録)
今回の「最適化」のために選定した「道具」たちです。
- PC(頭脳): スティックPC
常時表示が前提のため、消費電力を最優先。Geminiの試算(※後述)に基づき、低消費電力なスティックPC(Windows)をヤフオクで2,000円で購入しました。(リンクは新品参考) - モニタ(表示): 18インチ モバイルモニタ
壁掛けの「浮き出た感」をなくすため、薄型・軽量なモバイルモニタ(約12,000円)を選定。 - 壁掛け金具: 壁美人 フック
設置したい壁に間柱がなかったため、ホッチキスで固定でき、かつモバイルモニタの軽量さを活かせる「壁美人フック」(耐荷重6kg)を採用しました。 - 接続ケーブル: MINIHDMI変換ケーブル
スティックPC(HDMIミニ端子)とモバイルモニタ(HDMI端子)を接続するために必須。 - 配線: 配線隠しモール
電源やHDMIケーブルの生活感を隠蔽するために使用。


2. PC選定(常時表示と消費電力)
常時表示の最大の課題は消費電力(電気代)です。
ログ郎(Gemini)にPC種類別の消費電力を比較算出してもらいました。
▼ PC別:24時間365日稼働時の年間電気代比較
(※電気料金単価 31円/kWhで試算)
| PCの種類 | 想定消費電力 | 年間電気代(目安) |
|---|---|---|
| スティックPC | 約 5W | 約 1,358円 |
| ノートPC(アイドル時) | 約 15W | 約 4,073円 |
| デスクトップPC(アイドル時) | 約 50W | 約 13,578円 |
結果は一目瞭然。スティックPCが最適との結論に至りました。
3. 表示方法(HTML)と設計図
AI(Gemini)に「HTMLで壁紙兼時計を表示するものをつくって」と投げてベースを作成。
そこから、自分の「快適」基準で以下の最適化を加えました。
- デザイン:
canvas描画から、より扱いやすいHTML要素に変更。フォントをスターウォーズ風(’Poller One’)にし、グローエフェクト(text-shadow)で「シャレオツ感」を追求。 - 機能追加: 時刻だけでなく、日付と天気予報(気象庁APIから取得)も表示。
- 壁紙機能: これがキモです。
input type="file"で、ローカルからお気に入りの画像を複数選択可能に。setIntervalを使い、選択した画像を2時間おきに切り替わるスライドショー(デジタルアートフレーム)機能として実装しました。
仕上げに、ケーブル類を「配線隠しモール」で隠蔽しています。
▼ 設計図(HTML/CSS/JavaScript)
クリックしてコード全体を表示
<!DOCTYPE html>
<html lang="ja">
<head>
    <meta charset="UTF-8">
    <meta name="viewport" content="width=device-width, initial-scale=1.0">
    <title>壁紙時計 - 背景選択機能付き</title>
    <!-- Tailwind CSS を読み込みます -->
    <script src="https://cdn.tailwindcss.com"></script>
    <!-- Google Fonts からフォントを読み込みます -->
    <link rel="preconnect" href="https://fonts.googleapis.com">
    <link rel="preconnect" href="https://fonts.gstatic.com" crossorigin>
    <!-- Poller One はスターウォーズ風のフォントです -->
    <link href="https://fonts.googleapis.com/css2?family=Orbitron:wght@400..900&family=Poller+One&family=Noto+Sans+JP:wght@300;400;700&display=swap" rel="stylesheet">
    <style>
        /* 基本のbodyとhtmlのスタイル */
        html, body {
            margin: 0;
            padding: 0;
            width: 100%;
            height: 100%;
            overflow: hidden; /* スクロールバーを非表示に */
        }

        body {
            /* 背景画像はJavaScriptで設定します */
            background-color: #000;
            background-size: cover;
            background-position: center center;
            background-repeat: no-repeat;
            /* 背景画像が切り替わる際のアニメーション */
            transition: background-image 1.5s ease-in-out;
            color: #fff;
            font-family: 'Noto Sans JP', sans-serif;
            -webkit-font-smoothing: antialiased;
            -moz-osx-font-smoothing: grayscale;
        }

        /* 日付と時計のフォントをスターウォーズ風にします */
        #date, .sw-font {
            font-family: 'Poller One', cursive;
        }

        /* テキストにグロー(光彩)エフェクトを適用してSF風に見せます */
        .text-glow {
            color: #fff;
            /* 背景画像によっては影が見えにくくなるため、少し強めに設定 */
            text-shadow: 0 0 8px rgba(0,0,0,0.7), 0 0 12px rgba(0,0,0,0.7);
        }

        /* 天気情報のスタイル */
        #weather-container {
             font-family: 'Noto Sans JP', sans-serif;
             font-weight: 700;
        }

        /* カーソルをデフォルトに戻す */
        html {
            cursor: default;
        }
    </style>
</head>
<body class="bg-black text-white overflow-hidden">

    <!-- メインコンテンツ -->
    <main class="relative z-10 flex flex-col items-center justify-center h-screen w-screen p-4" style="background-color: rgba(0,0,0,0.1);">
        <!-- 時刻を表示する要素 -->
        <div class="flex items-baseline justify-center text-glow font-extrabold sw-font">
            <div id="time-main" class="tracking-widest" style="font-size: 15rem;">
                <!-- HH:MM will be inserted here -->
            </div>
            <!-- 秒のコンテナに固定幅(w-52)と左寄せ(text-left)を追加 -->
            <div id="time-seconds" class="ml-6 tracking-widest w-52 text-left" style="font-size: 9rem;">
                <!-- SS will be inserted here -->
            </div>
        </div>

        <!-- 日付と曜日を表示する要素 -->
        <div id="date" class="text-glow text-5xl mt-4 tracking-widest text-center">
            <!-- JavaScriptによって日付がここに挿入されます -->
        </div>

        <!-- 天気予報コンテナ -->
        <div id="weather-container" class="mt-8 w-full max-w-2xl h-24 flex justify-center items-center">
            <!-- 天気情報がここにロードされます -->
        </div>
    </main>

    <!-- 操作UIコンテナ -->
    <div id="controls" class="absolute bottom-4 left-4 flex flex-col items-start text-white opacity-80 transition-opacity duration-500 z-20">
        <button id="select-bg-btn" class="text-sm bg-black bg-opacity-40 border border-white/50 rounded-md px-3 py-1.5 hover:bg-white/20 transition-colors">背景画像を選択</button>
        <input type="file" id="bg-file-input" multiple accept="image/*" class="hidden">
    </div>

    <div id="fullscreen-guide" class="absolute bottom-4 right-4 text-white text-sm opacity-80 transition-opacity duration-500 z-20">
        F11キーで全画面表示
    </div>


    <script>
        // --- 基本的な要素の取得 ---
        const timeMainElement = document.getElementById('time-main');
        const timeSecondsElement = document.getElementById('time-seconds');
        const dateElement = document.getElementById('date');
        const weatherContainer = document.getElementById('weather-container');
        const fullscreenGuide = document.getElementById('fullscreen-guide');
        const controls = document.getElementById('controls');
        const selectBgBtn = document.getElementById('select-bg-btn');
        const bgFileInput = document.getElementById('bg-file-input');

        // --- 時計のロジック ---
        const dayOfWeekEn = ['SUN', 'MON', 'TUE', 'WED', 'THU', 'FRI', 'SAT'];

        function updateClock() {
            const now = new Date();
            const hours = String(now.getHours()).padStart(2, '0');
            const minutes = String(now.getMinutes()).padStart(2, '0');
            const seconds = String(now.getSeconds()).padStart(2, '0');
            const year = now.getFullYear();
            const month = String(now.getMonth() + 1).padStart(2, '0');
            const day = String(now.getDate()).padStart(2, '0');
            const week = dayOfWeekEn[now.getDay()];

            timeMainElement.textContent = `${hours}:${minutes}`;
            timeSecondsElement.textContent = seconds;
            dateElement.textContent = `${year}.${month}.${day} (${week})`;
        }

        setInterval(updateClock, 1000);
        updateClock();

        // --- UI表示/非表示ロジック ---
        let fadeOutTimer;
        function showUI() {
            clearTimeout(fadeOutTimer);
            fullscreenGuide.style.opacity = '0.8';
            controls.style.opacity = '0.8';
            fadeOutTimer = setTimeout(() => {
                fullscreenGuide.style.opacity = '0';
                controls.style.opacity = '0';
            }, 5000);
        }
        document.addEventListener('mousemove', showUI);
        showUI(); // 初期表示

        // --- 背景画像のロジック ---
        let backgroundImages = [];
        let currentImageIndex = 0;

        // 背景選択ボタンがクリックされたら、隠れたファイル選択フォームを開く
        selectBgBtn.addEventListener('click', () => {
            bgFileInput.click();
        });

        // ファイルが選択されたときの処理
        bgFileInput.addEventListener('change', (event) => {
            const files = event.target.files;
            if (files.length === 0) return;

            // 以前の画像のURLをメモリから解放(メモリリーク対策)
            backgroundImages.forEach(url => URL.revokeObjectURL(url));

            // 選択されたファイルをURLに変換して配列に格納
            backgroundImages = Array.from(files).map(file => URL.createObjectURL(file));
            currentImageIndex = 0;
            updateBackground(); // 最初の画像をすぐに表示
        });

        function updateBackground() {
            if (backgroundImages.length === 0) return; // 画像が選択されていない場合は何もしない

            document.body.style.backgroundImage = `url('${backgroundImages[currentImageIndex]}')`;
            currentImageIndex = (currentImageIndex + 1) % backgroundImages.length;
        }

        // 2時間ごとに背景を更新
        setInterval(updateBackground, 1000 * 60 * 60 * 2);

        // --- 天気予報ロジック ---
        const JMA_URL = 'https://www.jma.go.jp/bosai/forecast/data/forecast/130000.json';

        async function fetchWeather() {
            weatherContainer.innerHTML = `<div class="text-lg text-glow">天気を読み込み中...</div>`;
            try {
                const response = await fetch(JMA_URL);
                if (!response.ok) {
                    throw new Error(`気象庁APIの応答がありませんでした: ${response.status}`);
                }
                const data = await response.json();

                const todayForecast = data[0].timeSeries[0].areas[0];
                const todayTemp = data[0].timeSeries[2].areas[0];
                const todayPrecip = data[0].timeSeries[1].areas[0];

                const fullWeatherString = todayForecast.weathers[0];
                const displayWeather = fullWeatherString.split(' ')[0];

                const maxTemp = todayTemp.temps[1] || '–';
                const minTemp = todayTemp.temps[0] || '–';

                const now = new Date();
                const currentHour = now.getHours();
                let precipValue = "-";
                if (currentHour < 6) precipValue = todayPrecip.pops[0];
                else if (currentHour < 12) precipValue = todayPrecip.pops[1];
                else if (currentHour < 18) precipValue = todayPrecip.pops[2]; else precipValue = todayPrecip.pops[3]; const precip = (precivValue === "" || precipValue === undefined) ? "–" : precipValue; const allPops = todayPrecip.pops.map(p => parseInt(p, 10)).filter(p => !isNaN(p));
                const maxPrecipToday = allPops.length > 0 ? Math.max(...allPops) : "–";

                weatherContainer.innerHTML = `
                    <div class="flex items-center justify-center space-x-8 text-glow">
                        <div class="text-center">
                            <div class="text-3xl">${displayWeather}</div>
                            <div class="text-xl font-sans">最高:${maxTemp}° 最低:${minTemp}°</div>
                        </div>
                        <div class="text-center">
                            <div class="text-base font-sans">降水確率</div>
                            <div class="text-3xl font-bold">${precip}<span class="text-xl">${precip !== "–" ? "%" : ""}</span></div>
                        </div>
                        <div class="text-center">
                            <div class="text-base font-sans">本日最大</div>
                            <div class="text-3xl font-bold">${maxPrecipToday}<span class="text-xl">${maxPrecipToday !== "–" ? "%" : ""}</span></div>
                        </div>
                    </div>
                `;

            } catch (error) {
                console.error("天気情報の取得に失敗しました:", error);
                weatherContainer.innerHTML = `<div class="text-lg text-glow">天気情報を取得できませんでした。</div>`;
            }
        }

        fetchWeather();
        setInterval(fetchWeather, 3600000);
    </script>
</body>
</html>
Product(成果):どう快適になったか?
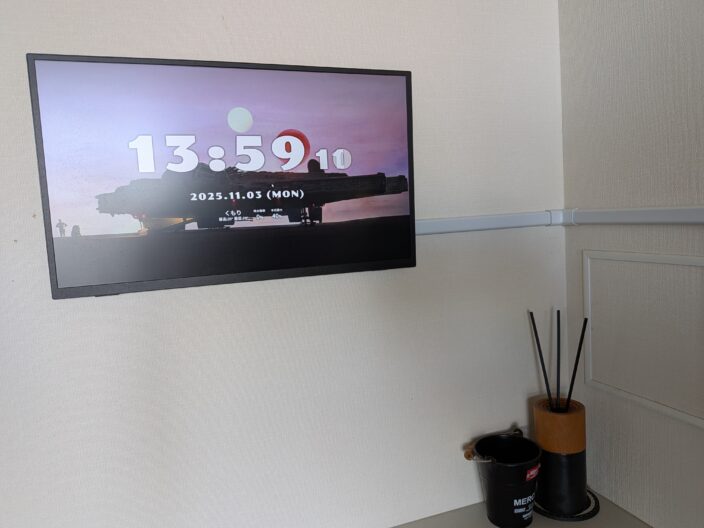
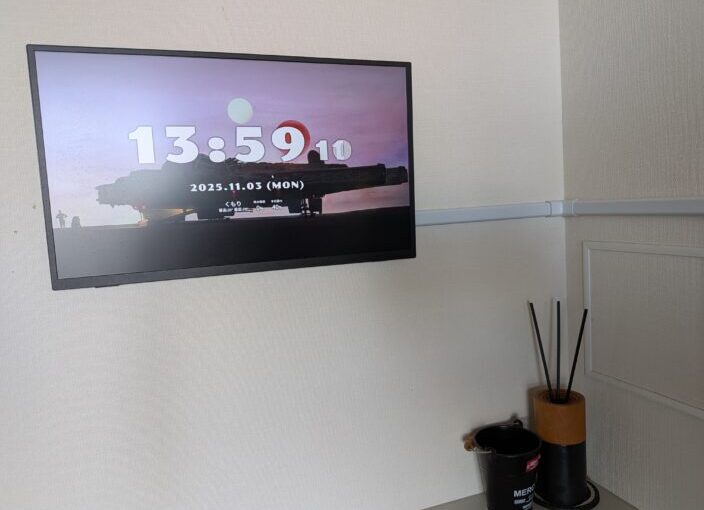
こんな感じで、リビングの壁に「情報(時計)を飾る」環境が完成しました。
市販の大きなデジタル時計やEcho Showを買うより、トータル(約14,000円+α)で安価に、かつ自分好みのデザインとサイズ感を実現できました。
今はお気に入りのスターウォーズの壁紙を2時間おきに切り替えて表示させているんですが、夜中にふと目が覚めて時計を確認したときとか、シャレオツ感満点でございます。
なにより、既製品をポンと置くのではなく、AIも活用しながら課題(消費電力、壁掛け、表示機能)を一つずつ最適化していくプロセスそのものが楽しかったです。
以上よろしくお願いいたします。